Monday, June 4, 2012

Test Kitchen Tuesday: From Ground to Table

This year, I decided to hold no expectations from our little garden. Last year's garden did not go well at all. So while I tried to learn from that experience, and carry over the knowledge obtained to this year's garden, I maintained that I was going to put the plants in the dirt, water them, weed them, keep them free of pests, and whatever happens will happen. This year, we kept it small, both out of necessity and practicality. We no longer live on the three acres that we had use of last year. Our yard is very small, and many people would not think of growing vegetables! I think this has been to our advantage, because it is not as overwhelming and I am able to care for the garden much better. We also are using a raised garden bed and other containers, giving us more control over the soil. And finally, we did not plant seeds this year, but bought young plants already started to transplant into our garden. Again, this served to keep me from getting overwhelmed, and allows me to get more familiar with the plants I am growing before trying to get them to grow from seeds. The end result to these changes from last year-sweet (small but mighty) victory. It might not look like much, but compared to our yield from last year it is bountiful. Okay, that might be stretching it a bit- so far we have three varieties of lettuce that we are enjoying, and this week- broccoli!

We have had an extremely warm spring this year. Actually, it seems in a lot of ways that we skipped spring and went straight into a very hot summer. A lot of produce has been ready weeks earlier than is typical for our area. So I wasn't surprised when I saw beautiful broccoli florets peaking up over the leaves. I was, however, surprised at how quickly they went from beautiful broccoli florets to beautiful flowering broccoli!

At first I was disappointed. No broccoli again this year. And that is the item that the kids really wanted to grow themselves. But wait! Why not!? Are flowers of the broccoli really inedible? We eat the buds, after all! So the kids and I did a little research and found that the broccoli flower is in fact edible, and furthermore- get this- it tastes like.... BROCCOLI! So we dove into this as a learning experience for not only the kids, but also the adults. As we filled our bowl with the stalks of tiny yellow flowers, I excitedly emphasized how cool it is that we planted this broccoli, and it grew into flowers, and now we were going to eat them! The kids seemed very excited.

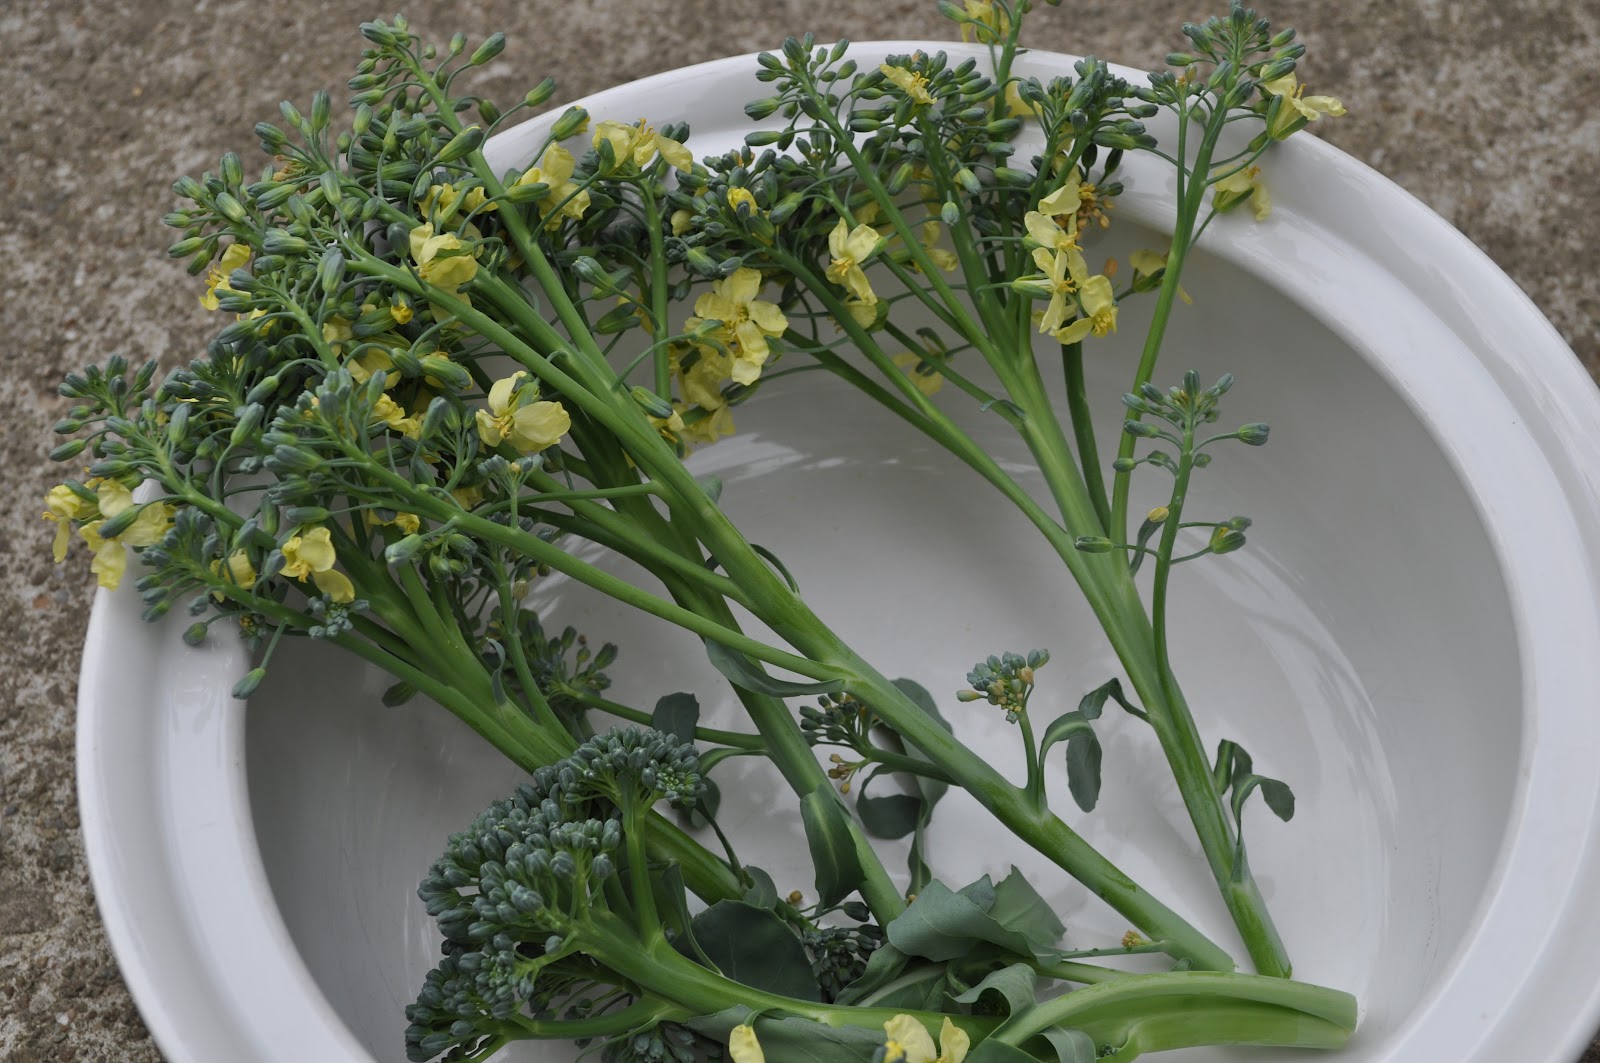
Now the most tame way I can think of to try an unknown food, is a soup. Perhaps because it is an unknown within a substance that has come to be so comforting- who doesn't take comfort in a nice bowl of warm soup on a chilly day or when one is sick. So that is what we will do with it. We'll make it into a soup. This idea was inspired by this recipe at cooks.com. There were a lot of ingredients that I did not want to include in my meal, however, so we came up with a recipe that has a bit more of a whole foods approach.


About 4 tablespoons olive oil
pat of butter
1/4 small onion, sliced
4 cloves garlic, minced
about 6 large leaves fresh basil
a few sprigs fresh rosemary
fresh thyme
fresh oregano
about 3-5 cups flowered broccoli, stems and leaves included, chopped coarsely
3 cups chicken stock
2 cups whole milk
2 tablespoons corn starch
1/4 cup plain greek yogurt
4 cups shredded mild cheddar cheese


Finely chop the herbs and broccoli leaves together. Heat the oil and butter in the bottom of a stock pot, over medium heat. Once the butter melts and the oil shimmers, add the onions, garlic, herbs, and broccoli leaves. Stirring constantly, cook until the onions begin to turn clear. Be careful that your oil doesn't get too hot. Add the chicken stock and bring to a simmer. Add the broccoli and simmer for a moment. Slowly stiir in the greek yogurt and milk, reserving 1/4 cup of milk. Put the cornstarch in a small bowl and whisk the milk into the cornstarch using a fork. Slowly stir the cornstarch mixture into the soup and bring back to a simmer until soup is thickened. Turn off the heat and allow to cool for a couple of minutes. A little at a time, sprinkle the shredded cheese into the soup and stir until melted. If the soup is too hot when you add the cheese, it will turn out grainy and lumpy. Stirring in very small amounts at a time when it is off heat will allow the cheese to melt smoothly and evenly.

Ladel into bowls and garnish with more shredded cheese and a couple of the broccoli blossoms!


You can add other veggies like carrots and potatoes, and if you want you can add bacon too. But the thing I like about this soup is that its simplicity really let the flavors of the herbs and the broccoli flowers sing. I could really taste each individual ingredient, and I don't think that would have been the case if I added more flavors or a stronger cheese. But this is very basic and you can mix it up with whatever you want or like!

We served this with a salad of the greens from our garden as well, and sausages. I was worried that the kids would not eat dinner, but they continued to clean their plates and ask for seconds, thirds, fourths... until we had none left. Salad, flowers, and all. I think that is wonderful testimony to the notion that kids will eat vegetables that they've helped grow and prepare.


Sunday, May 27, 2012

Long Weekend Fun

This holiday weekend is hot, hot, hot! And for the first time in my life, I am living with no AC of any kind. I have lived with central air, I have lived with window units in just a couple of rooms, and I have lived with a unit in just one room. But never lived without having the reassurance that there is somewhere to go to escape the heat.

To cool off in our yard, we decided to break out the very popular water table. I thought that this would be the perfect opportunity to also try out sidewalk painting! It is very simple, and took all of our minds off the beating heat.

What you need:
Cornstarch
Water
Food Coloring
Paint Cups or other containers (yogurt containers or old empty play dough containers would be great!)
Small bowl to mix the water with the color
Paint brushes
a good piece of sidewalk or driveway

In a small bowl, mix about 3-4 tablespoons of water with 6-10 drops of the desired color of food coloring. I like to mix the color into the water first, because that makes the color very even, and easier to mix in. In the paint container, put about 2-3 tablespoons of cornstarch. You want there to be more water than cornstarch, however the consistency is up to your preferences. If you don't add enough water, the paint will be hard to spread on the sidewalk and will just kind of blob up. If you've ever made oobleck with your kids then you are already familiar with the reasons why! But you also don't want it to be too watery, because the paint will run all over and won't be much fun. At any rate, place the cornstarch into the container. Slowly add the colored water until you get a consistency that you like, stirring as you add. Repeat with as many colors as you wish to have. The kids had a lot of fun helping to make it.

Take it outside, and find your inner Picasso! Or, in my kids' case, Jackson Pollock!

As the sun dries the water from the mixture, the paint will start to look more chalk like.

A word of warning- food coloring WILL stain clothes. While making this and playing with it outside, I suggest the kids wear clothing that doesn't matter if it gets stained, or let them wear art shirts. This (just like sidewalk chalk) seems to be attracted to pants especially, so dress accordinlgy and don't send me an angry email that this ruined your child's best party clothes- I warned you! But this I can tell you, the FUN we had with this is worth every messy detail!

Tuesday, May 1, 2012

Tuesday Test Kitchen: Graham Crackers


Graham crackers are something that I have been wanting to bake with the kids for a long time. I have made several other kinds of crackers in the past, but because the ingredients are somewhat expensive and not something that I generally keep on hand, I have put it off. But I finally decided, after mulling over the guilt of the ingredients list on most store bought boxes of grahams, that it is time to try. I used Alton Brown's recipe from foodnetwork.com although that recipe meausures ingredients by weight. I thought this would be a wonderful time to let Jonah practice weighing things, until I turned on my kitchen scale and found that the batteries were dead. So I used the approximate volume measurements instead. Cooking with kids involves a lot of ingredients being spilled on the counter, half a tablespoon might end up oozing down the side of the bowl rather than in the bowl, and so on. So even though Alton is extremely precise in his measurements, I found that it is okay to eyeball things and adjust according to any ingredient mishaps. We also had to make some last minute equipment changes.

1 1/2 cup + 1 tsp graham flour
1/4 + 3 Tbl cup all purpose flour
5 Tbl sugar
3/4 tsp baking powder (aluminum free)
1/2 tsp baking soda
1/2 tsp kosher salt
1/2 tsp cinnamon
6 Tbl unsalted butter, chilled and cut into small cubes
4 Tbl + 2 tsp molasses
3 Tbl + 2 tsp milk
1/2 tsp vanilla

In a bowl, combine the graham flour, flour, sugar, baking powder, baking soda, salt, and cinnamon. Mix until combined evenly.
Add the butter and use your hands to incorporate the butter with the dry ingredients. This involves squishing the butter and flour mixture between your fingers, until it is evenly incorporated and about the consistency of corn meal. You can use a food processor to do this, but ours was found to be missing a part. Plus, this is more "hands on" for the kids. (wash their hands very well, and my general rule is that any foods the kids have had their hands in, is ONLY for our own family.)
Using a stand mixer (or continuing to use the food processor if that is what you already used for the butter) add the molasses, milk, and vanilla. Start on low and gradually move to a medium high speed and mix until the dough is starting to pull away from the sides of the bowl. It should take 30 seconds to 1 minute.
And of course, here is evidence of the "measuring mishaps" I was describing above! about 1/4 of the molasses did end up on the table, so I added what I thought looked like the amount that had been spilled. The taste was still very good, so don't sweat small spills.

Remove the dough from the mixer or food processor and shape into a disc. Wrap in plastic wrap or place it in a zip top bag (we don't keep plastic wrap in the house, normally) and place in the fridge during naptime, or at least for a half hour.
Our dough ended up being in the fridge for quite a while- nearly five hours- because Jonah's nap went super late. When we removed it from the fridge, it was way too stiff to roll out. It needed to sit out for about 45 minutes or an hour before we could roll it. I don't think it would have needed to rest at room temperature like this if we had only let it chill for the recommended half hour.

Preheat the oven to 350 F. Unwrap the dough and place it on top of a piece of parchment paper. Place another sheet of parchment paper on top of it. Roll the dough out into a rectangular shape, about 1/8 of an inch thick. I like to use my canning headspace measurer to make sure that my dough is rolled to the correct thickness. Here you can see that it is about half way up to the 1/4 inch mark.

Use a pizza cutter to cut the dough into rectangles. Don't worry about making them perfectly even, or making perfectly straight lines. If you allow your child to help with this step, monitor them closely.


Using a fork, poke each rectangle about 3 times. This will allow air to escape and keep the crackers from getting large bubbles. The kids really enjoyed this step!
Place the dough and parchment paper onto a cookie sheet and bake until the crackers rise a bit and begin to turn a bit darker brown around the edges. The original recipe says 25 minutes, but ours were starting to burn around the edges at just 15 minutes, so keep an eye on them.

Remove from the oven and allow to cool completely. Break the crackers apart along the lines and enjoy!


I would like to try replacing the molasses with honey and bananas to create a cinnamon-banana graham cracker. This is a very basic recipe that seems like it would lend itself to a few variations, although with something as plain and simple as a cracker, the chemistry can easily be thrown off by ingredient substitutions. It is definitely going to be worth bringing back into our test kitchen on another rainy day!

Friday, April 27, 2012

A Few of my Favorite Things Friday


1. When my toddler wraps her arms around me for a hug, and starts patting my back

2.The few moments before bedtime, when the whole family is on Jonah's bed for night time stories and lullabyes.

3. Belly laughs during an impromptu tickle session

4.Watching my children cooperatively set up a tea party, complete with pleases and thank yous

5. Seeing my son, who two years ago was diagnosed as being autistic, walk up to another child and say "Hi, I'm Jonah. Her is Evie. Let's play firefighters!"

Tuesday, April 24, 2012

Fired From Oscar Meyer- No Weaners Here!

I can sit here and tell you that the global average age for weaning is 4 years old. I can tell you that naturally, mammals typically nurse until they get their first permanent molars- around age six for humans. I can say that the World Health Organization recommends breastfeeding children until the age of two years old, and that the American Acadamy of Pediatrics says that mothers are "encouraged to continue breastfeeding through the first year and beyond as more and varied complementary foods are introduced." Let me re-stress that: Through the first year and beyond. One more time: and beyond.


I could tell you that she isn't ready. I could tell you that Michael Jordan was breastfed until he was 3. I could tell you all of these things and then some. As if I have to defend the choices I have made for myself and my child.

The truth is, most often times, I do. Because this little girl:
Is no weaner. And she will also be two years old next month. Yes, I breastfeed my nearly two year old. My beautiful two year old baby girl. My baby. In many ways, emotionally, physically, and cognitively, two year olds are still babies. They still need the antibodies and nutrition found in breastmilk. They still need the reassurance and emotional stability that breastfeeding provides. They still need the quiet bonding time with their mothers.NEED. As in Maslow's Hierarchy of Needs. If other babies and mothers find other ways that help them with these things, then that is wonderful; it works for them. Live and let live, right?

Yet when people find out that I nurse my nearly two year old, I have to defend myself and my daughter. As it has been from the start, the game of nursing is changing for us.

For example, I try my hardest not to nurse her out in public, if at all necessary. Not because I am ashamed, or because I am a "closet nurser." But because I am unsure whether or not the laws that protected me and my babies when they were infants, still protect us now that my nursling is what society calls a "toddler."


When this picture was taken while enjoying a Cleveland Indian's game at Progressive Field, the law was on our side. I could breastfeed in any public place where both I and the baby were allowed to be. We were allowed to be in the stadium, in those seats. We bought the tickets legally. No one could ask me to leave that seat for the sole reason that I was breastfeeding.

Now however, I am unsure. I cannot find specifically that it protects a child beyond infancy. And so, to avoid awkward confrontations, I try to sway her attention to other things, or find someplace very private (but still not the bathroom!) Another reason is because she is beginning to read other people's emotions and reactions to things. When people see her asking to nurse, comments are made, glares are exchanged. I don't want her to think that what she is doing- the wholesome and natural and RIGHT thing (for her)- is wrong, just because other people say it is.

And because well meaning friends and family members have said to me "you just need to do it." Let me share with you, our attempt to night wean my dear daughter. I began wondering if everyone else was right. Maybe we would all start getting good nights' sleeps if she weaned. Maybe we would all be happier. I wouldn't be so stressed during the day. Maybe, just maybe. Worth a try, I thought. The plan seemed simple. I would create timeframes during which she could nurse at night. If she woke and fussed during a time that was not within the designated nursing time, then I would hold her, cuddle her, sooth her back to sleep. The idea was that this would help us lengthen the periods of time between night feeding. It seemed to be working, so we moved onto phase two. Knocking out one nursing session.

This is where it turned sour. She not only cried during the time she wanted to nurse and was not being allowed, but she started to scream and cry at the start of bedtime too. Before our attempts to wean, we would do our night time routine (which includes nursing) lay her in her bed, and walk away. When she would wake up at night, she would nurse for 10-15 minutes, climb out of my lap and go back to bed on her own. Now that I think about it, it was relatively easy. After our attempt to wean, she screamed while we were putting her to bed. She woke up within an hour and began screaming again. She developed terrible separation anxiety, and I would have to wait by her door for her to fall asleep. If I didn't, she didn't sleep that night. She would scream. all. night.

During the day, she became very clingy. Where she was once my independent and self confident girl, she became insecure and needy.

Her whole demeanor changed.

Because we tried to wean before she was ready. My way of coping with this was to give her what I could see that she needed. We began nursing through the night again. She has decided on her own that one nursing session at night is enough. She has gone back to putting herself back to bed after only a few minutes at the breast. We are all sleeping better. I am not as stressed during the day. We are all happier. Because we did what was right for our family. Because I followed my little girl's cues. Does this mean she will go off to college breastfeeding? No. I know there is such a thing as natural weaning. It happens every day. Does this mean that I am a "slave" to my child? I certainly don't feel that way. I enjoy the bonding time. I know that soon she will be grown up. She will be interested in shoes and hair and prom... So I will continue to do for her, what she needs now.

Monday, March 12, 2012

Pepper Shamrock Stamps


This morning we had eggs inside of pepper rings for breakfast, and we didn't eat all of the peppers, so I thought we should use them for a little "Luck o' the Irish" art. I have always loved St. Patrick's Day. Even though I have always lived in a place where winter lasts well into April and often even into May; even though my birthday is just two days after St. Patty's day and I was born in a blizzard... the decorations of vibrant green plants, shamrocks, spring rainbows, all lift me up and out of my winter funk. 

Most of our activities this week are themed around rainbows. I thought that would be a fun way to incorporate some learning activities into all of the fantasies of leprechauns and pots of gold. Of course as the children get older, we will be teaching them about St. Patrick, why there is a day to celebrate him. But for now we are having fun making pepper prints of shamrocks
 
Simply cut a pepper laterally, dip it in green paint, and use it to stamp the shape! It is a fun coincidence that the shape of the pepper, especially towards the bottom, resembles a shamrock.
Keep some damp cloths nearby to wipe paint from hands, because the smooth skin of the pepper makes it difficult to pick up with slippery paint on your fingers! I thought about cutting the top of the pepper in a way that would make a handle, but in the end decided not to go through the trouble.
Although the kids are still learning what a shamrock is, they really had a lot of fun stamping the shape of the peppers.

Sunday, March 11, 2012

Moments of Beauty

When I was young, the church that my family attended would have a time for congregation members to share "joys and concerns" for which they would like to have a prayer. Every week, one particular elderly woman who was known to be quite eccentric, would stand and share her "moments of beauty" with the church. Moments, small and large, that struck her as something that was God-filled. Moments when, even just for a fleeting second, she had something beautiful in her heart.

Today was a beautiful day for a run. Mid 60's, sunny, cool breeze. My training schedule said I should only take seven miles, but instead I went for nine. And along the way, I had several moments of beauty that I would like to share. Am I becoming a kooky eccentric old woman? Well, I turn 30 this week, so I may well be on my way!
1. Passing by gardens filled with purple, white, and yellow crocuses in full bloom; tulips and daffodils appearing to be nearly ready to burst open from their buds. A tad early this year, but beautiful just the same.

2. Hearing a group of children laugh as they played baseball.

3. Running on a work of art

4. Being near the tennis courts and realizing how much I miss my tennis partner and best friend- it would have been a great day for a pick up game with a friend. It's always nice to think of an old friend when they are living across the globe.

5. Seeing an elderly couple holding hands and smooching every now and then as they walked on the path in the park. I hope Daryl and I are as affectionate towards each other as we age.